
To navigate the Activity Editor, use the toolbar and menus to access and modify various aspects of the activity, such as its content, settings, and layout, in order to create or editcontent.
How to Publish Activity?
-
Click the “Publish” button.

-
The toast message “Activity was published successfully” appears and the published Activity is displayed in the list of Activities with “Published” status.
How to Set Due Date in the Activity Editor?
- Click Settings button on the left side.
-2.png?width=688&height=202&name=Untitled%20design%20(1)-2.png)
- Set Date and Time (AM/PM).
- Save changes.
-2.png?width=688&height=432&name=Untitled%20design%20(2)-2.png)
- The toast message "Due Date is updated successfully" is displayed.
- Selected Due Date is displayed in the Due date column on the Activities list page.
-2.png?width=688&height=152&name=Untitled%20design%20(3)-2.png)
How to Allow auto grading for Submissions?
-
Settings in the Activity Editor.
-
Enable checkbox “Allow auto grading submission”.
-
Save changes.
How to Allow students to submit after the due date?
-
Settings in the Activity Editor.
-
Enable the checkbox “Allow students to submit after the due date”.
.png?width=688&height=431&name=Untitled%20design%20(7).png)
-
Save changes.
How to Add an Attachment to an Activity?
- Open Activity Editor to edit activity.
- Click "Attachments" on the right side of the screen.
.png?width=688&height=160&name=Untitled%20design%20(8).png)
- Upload attachments.
-2.png?width=688&height=370&name=Untitled%20design%20(9)-2.png)
- Select browse to add your attachments
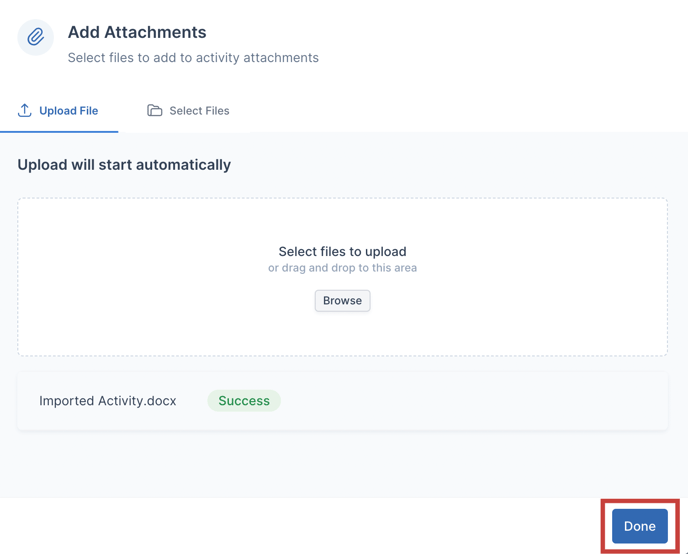
- Select "Done" once you have added all your attachment
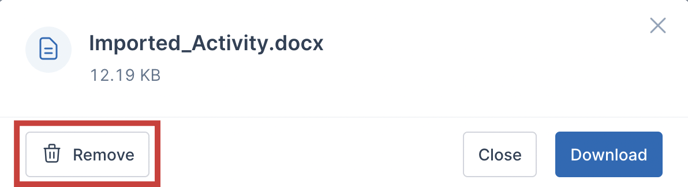
How to Remove Attachment?
-
Select an attachment.

-
Click the "Remove" button.
How to Download an Attachment?
- Select an attachment.
- Click the “Download” button.
.png?width=688&height=188&name=Untitled%20design%20(10).png)
How to Add Files as Attachments in Activity Editor?
- Open Activity Editor to edit activity.
- Click "Attachments" on the right side of the screen.
- Upload attachments.
- The Add Attachments modal is displayed
- Click on the "Select Files" tab to view uploaded files to your campus

- Choose the file you want to add by selecting the box
- Click "Done" to finish adding your file to the activity
How to change Image in activity editor (free account)?
- Create new activity in campus with Free plan > Default image is "Python (Lambda)";
- "Lambda" tile is displayed
- Click on the "Python (Lambda)" button:
.png?width=688&height=174&name=Untitled%20design%20(11).png)
- Click on the "Python (Lambda)" button:
- Image Selecting modal is opened.
.png?width=688&height=900&name=Untitled%20design%20(12).png)
-
- Non Coding - enabled
- All LAMBDA images - enabled
-
- Select any enabled image and click on the "Save" button
.png?width=688&height=900&name=Untitled%20design%20(13).png)
- Selected Image is applied;
- Modal is closed;
- "Lambda" tile is displayed if any LAMBDA image is selected
How to change Image in activity editor?
- Create new activity in campus with paid plan > Default image is "Non Coding".
- Click on the "Non Coding" button.
- Image Selecting modal is opened:
.png?width=688&height=900&name=Untitled%20design%20(14).png)
Available images:- Non Coding - enabled
- All LAMBDA images - enabled
- Image Selecting modal is opened:
- Select image and click on the "Save" button
- Selected Image is applied;
- Modal is closed;
- Worker is NOT displayed for all LAMBDA images;
- "Lambda" tile is displayed if any LAMBDA image is selected;
- Worker changed it's status to Connecting => Connected